As I mentioned in my last post, I ordered the Titan last week as part of the Prusa i3 Upgrade Kit and it arrived today along with some sheets of 3M 468MP adhesive I had also ordered recently from Digi-Key (despite also mentioning in that same post that I was worried about messing something up). Just in time for my birthday tomorrow, too. A shout out to Dan, Lawson and the E3D team for their awesome service and getting this to me so quickly, and thanks for the sweets! Boy, I can’t wait for the weekend. I want to install it right now but I don’t want to do a rush job, either.
reprap
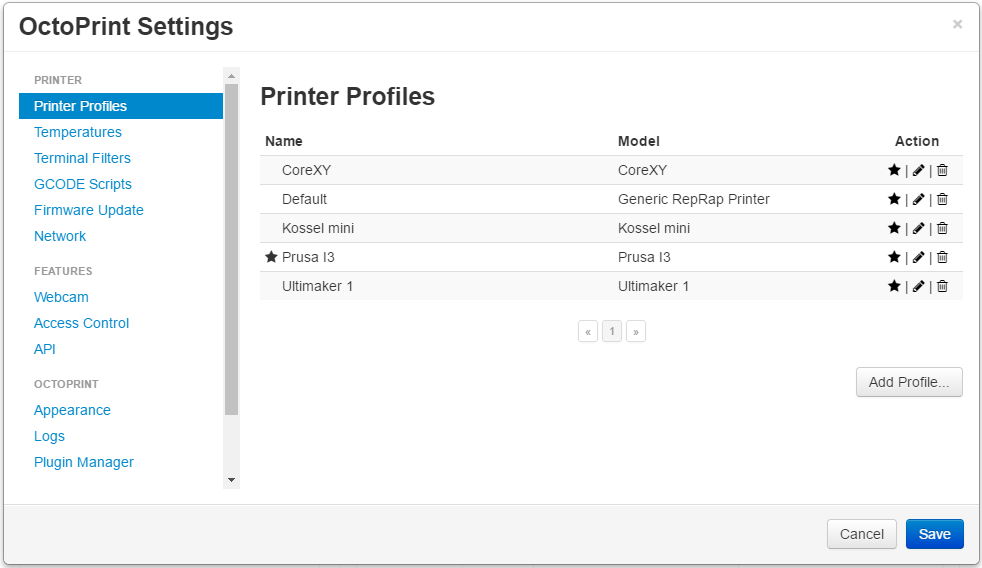
New Extruder: Update #2
Hello everyone!
So, widening the groove on the new direct drive extruder didn’t turn out well. Even with a larger cut-off disc, it was difficult to widen the hot end groove. I ended up cutting too deep and exposing some infill – not good, that would allow more heat to creep into the body of the extruder, probably eventually resulting in a meltdown.
New Extruder Update
So, as per usual it’s been busy for me, and unfortunately 3DP0 has been sitting idle for the past few weeks or so . Luckily, I snagged some vacuum bags and a couple of large moisture grabbers from the dollar store and had some extra desiccant packets lying around. This allowed me to finally store my unused filament without worrying about dust or humidity. Everything’s in a dark closet for now (I plan on buying some bins with lids to store them soon – maybe also a drying bucket / lamp setup too). Now, about that extruder…

Upgrades and Updates
Hello everyone!
So, I don’t have much this time, except for some news and things up-and-coming.
3DP0 Goes to Work!
Hello everyone! It’s been quite some time since my last post. Things have been busy for myself (and my wife – who’s now @ a new job) and I just haven’t been able to force myself to get in front of a computer after hours.
Initial Setup and Calibration
Finally! Everything’s been mounted. Everything (as far as I can tell) is in good working order. There’s no shorts, no funky behavior and best of all, no magic smoke pouring out from any of my components. I had the green light, and started messing with my printer’s firmware and running some test prints – so far, I’m liking what I see.
Wrapping up the Build
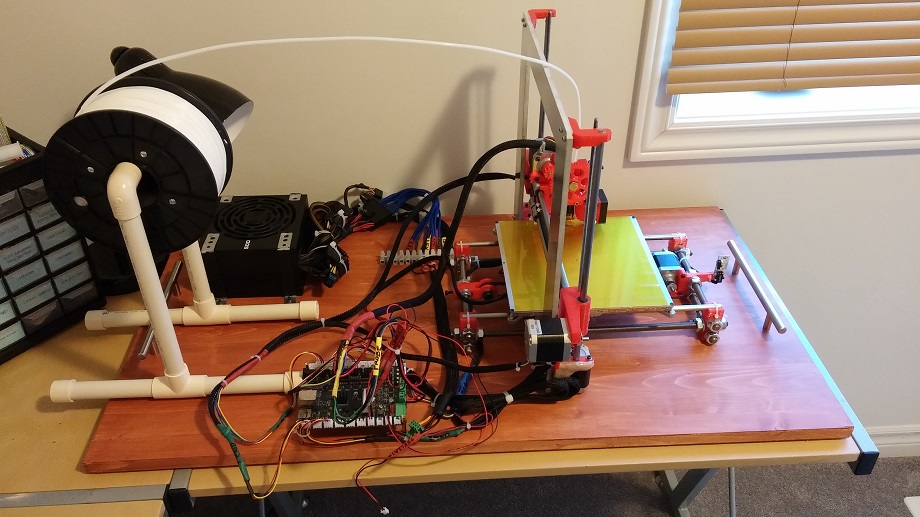
This is a continuation from the last post, where I talked about building up and installing the heated print bed. For this update, I’ll be going over mounting the printer to the project (pine) board, laying out all of my completed wiring and building a spool holder. This should bring the actual physical build of the printer to a close (I’m currently salivating at the thought – I can see the light at the end of the tunnel!). From there on out, it’s calibration, tuning and tweaking via firmware and software (slicer) settings. Not to say there may not be the odd mechanical or electrical tweak, but I still categorize that under tweaking / tuning. Onward!

Heated Bed
Lesson: Never order something and not test it, especially if its from a questionable source.

Mounting Board and Power
While I could leave the printer as-is and just drop it on my workbench desk, it would be an awful mess and to be honest, the Prusa i3 Rework single sheet frame isn’t all that stable on it’s own. Dropping it onto a project board (basically a semi-finished piece of pine on the cheap as it’s not a perfect cut / surface) will help, but ultimately later I’ll need to brace the frame – which will be secured to the same board as well. That’s the topic for this update – and RAW POWER too, of course.
Continue reading

Extruder and Wiring
Another day, another wire soldered – only a few dozen more to go! I knew printers required a lot of wiring, but the realization of that didn’t sink in until I was sitting in front of it all trying to figure out where to begin.